Thursday, 20 November 2014

Deck the Halls with Brittany: Holi-DIY #1

Hi Everyone!

So today I have decided I'm going to kick off my new series of Holiday posts. It will be purely Christmas related as I live in Canada and have already celebrated Thanksgiving. If you are looking for Fall DIY's then please look at my I Love Fall series.

Today's Holi-DIY is going to be very simple and is not time consuming at all. You can even do this with kids at home or in a classroom. Let's get into it, shall we?

Things You Will Need:
-old picture frame
-Christmas themed paper
-ornament(s)
-glue gun
-glue gun sticks


Step 1:
Take your Christmas themed paper and the back of the frame and trace around the back of the frame. Cut out what you have traced. Remember to cut inside the lines to make sure that the paper will fit in the frame.

Step 2:
Once the paper is cut out, place it in the frame and put the backing back on and secure it shut. Turn the frame around so you can see the paper you just placed in there.

Step 3:
Plug in your hot glue gun. While you are waiting for it to heat up, decide which ornaments you would like to place on the paper. I decided to keep it simple and only put one ornament but you could get creative with it and do more than one. It's entirely up to you.

Step 4:
Once you have decided, take your glue gun and carefully place glue on the back of the ornaments. Remember, try not to wait too long because hot glue dries quickly. Stick the ornament onto the paper. Keep doing this step until your frame is how you like it.

Step 5:
Once you have finished gluing the ornaments onto the paper, place it somewhere in your house or apartment to add some festive cheer!

So that was a very easy DIY for Christmas decor. I found similar things on Pinterest and Youtube so you can look there for more ideas of what to do with different ornaments. I hope you have fun doing this little project. Be sure to leave me pictures in the comments section. I would love to see what you all come up with! Until next time, Happy Crafting! xoxo


Saturday, 15 November 2014

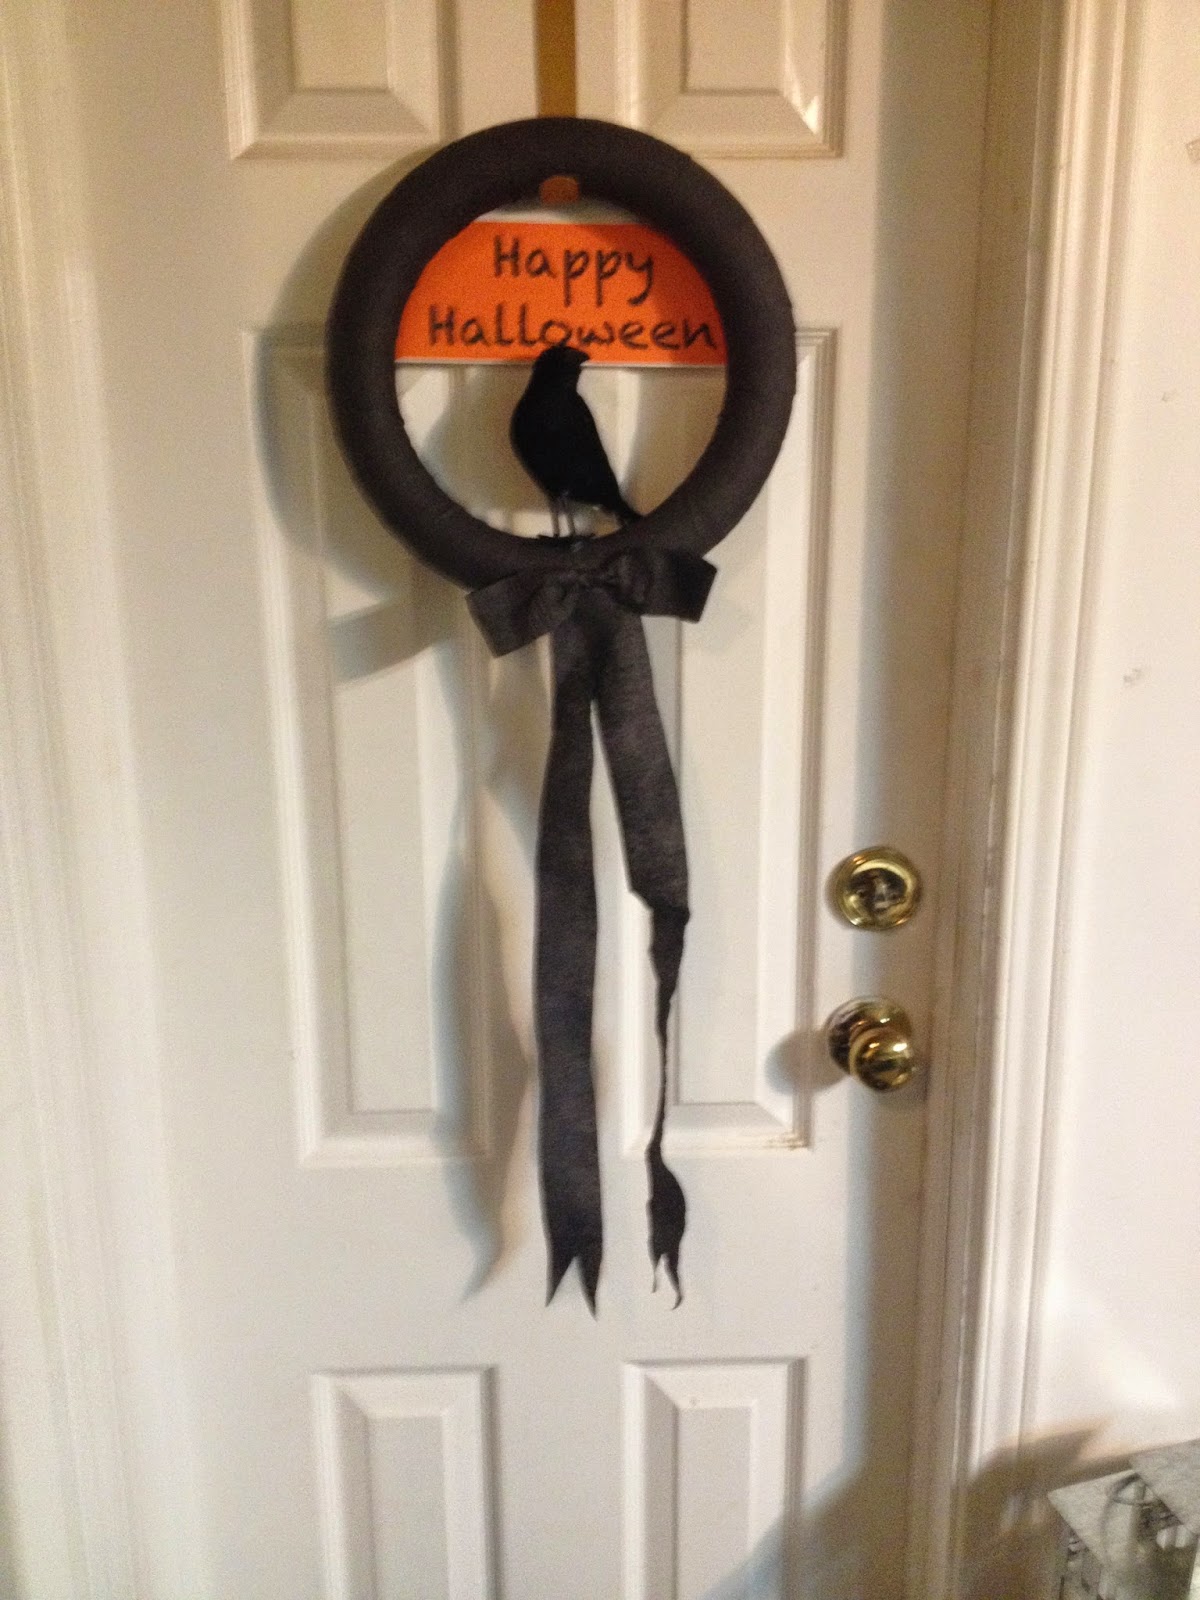
Happy Halloween: DIY Halloween Wreath!

Hello my fellow crafters!

Hope you all are enjoying this chilly weekend! So as the title states, I'm bringing you another Halloween DIY! I know Halloween is now over, but I figured I would still post it so that people can make it for next year. It only takes about 20-30 minutes. It is also fairly cheap. The stuff I did have to buy I bought at the dollar store or at Michaels. Let's get into it, shall we!

Things You Need:
- a styrofoam circle wreath (I got mine at Michaels with a 50% coupon - I paid $5 instead of $9)
- a crow figurine (I got mine at Dollar Tree - It had metal wire coming out of its feet)
-black crepe paper
-a glue gun and glue gun glue sticks
-a piece of cardstock
-computer and printer

Step 1:
Unstick the end of the crepe paper and put some hot glue on the end. Stick it to the styrofoam wreath. Very carefully, start wrapping the crepe paper around the wreath covering up the green styrofoam. If you are wrapping tightly, be careful. I ripped it a couple of times. When you are completely done wrapping, put some glue on your other end and glue it down.

Step 2:
Stick the crow figurine into the styrofoam. He may not be really sturdy so you may want to think about hot gluing his feet to the wreath. Wait for it to dry.

Step 3:
In a Word document (or a word processing software similar to Word), find a font and font size you like and type out "Happy Halloween!" It can be whatever you like but i chose to go with Happy Halloween. I also made it so the background colour was orange. Print that out once you are satisfied with it.

Step 4:
Glue your sign to the wreath. I glued the front side of the sign to the backside of the wreath. Be sure to leave space for your hook or over-the-door wreath hanger. If you want, you can add a bow with some of the crepe paper. All you do is cut about 3-5 inches of crepe paper. Then you glue down the ends so they meet in the middle. Then glue and wrap a small piece of crepe paper around the middle so that the bow bunches. Next, cute a longer piece of crepe paper. Fold in half. This will be the hanging ribbon part. Cut a upside down "V" into both ends. Glue it to the bottom of the wreath. Then glue the ribbon on top of what you just glued down.

Tuesday, 28 October 2014

Happy Halloween: DIY Jack-o-lantern Bowl!

Hi Everyone!

So Halloween is almost here! I can't believe that October is nearly over! A lot of you will be prepping your houses for Halloween, so while you are doing that, why not add this cute little Jack-o-lantern bowl to your decor? He is super easy and cheap to make. Let's get started!

Things You Need:
-Round glass bowl
-Orange paint
-Black paint marker

Step 1:
Take your glass bowl and carefully wash it with soap and water. Rinse it out and dry it.

Step 2:
Once it is dry, you can pour some of the orange paint into the bowl. Slowly, rotate the bowl around on its side. The goal is to cover the inside with the paint. If you need to add more, feel free.

Step 3:
Once you have covered the inside, you can pour the excess back into the paint bottle or you can leave it in the to dry at the bottom of the bowl. I did the second one because there wasn't a lot of paint in my bowl left. Leave it to dry.

Step 4:
Once it is dry, take your black paint marker and draw on the eyes, nose and mouth however you would like. If you feel it is too thin and you can see orange through the black paint, very carefully go over it a second time. I found that dabbing the areas that were thin worked better than drawing over top it. Let that dry and then you are done!

So that is the little Jack-o-lantern bowl decor piece. I haven't decided where I am going to put him, but I'm sure I will find a spot for him. I hope you enjoyed this DIY Halloween project! If you do this DIY, then be sure to leave me pictures in the comments section.
I would love to see them! Happy Haunting! xo

Tuesday, 14 October 2014

Spruce up those boring Notebooks!

Hi Everyone!

I'm back again with another post I had originally wanted to do back in September, but due to slacking on my part, it is going up now. Personally, I like to have a notebook on hand when I'm in class so I can jot down notes for each day. I always go to the Dollar Store to get my notebooks, but sometimes the covers are kind of ugly. So I figured I could spruce it up on my own. This project is easy and won't take too long to do, depending on how creative you get with it. Let's get started, shall we?

Things You Will Need:
-scissors
-notebook
-different things to decorate the notebook
-full sheets of sticker paper (the kind that isn't pre-cut)
-pencil


Step 1:
I didn't have anything else to use to cover the notebook, so I used sticker sheets. I traced the one side of the notebook. Then, I cut out the sticker paper and after peeling back the backing on the sticker paper, I stuck the sticker paper to the front of the notebook. (Note* You may have to do this a couple of time depending on how opaque or transparent the paper is). You may also need to do this to the back of the notebook.

Step 2:
Next, decorate the notebook as you see fit. Get creative with this part. I kept mine fairly simple. I may add to it, but I haven't fully decided what it will be used for yet. You can use all sorts of things for this. Use things like washi tape, scrapbooking paper, scrapbooking stickers, stamps, materials, ribbons etc. Once you are satisfied with your notebook, you can begin using it. Enjoy!

I hope that you enjoyed this DIY project! If you do these yourself, be sure to share them with me! I would love to see what you all create! I hope you have a great afternoon! Happy Crafting! xoxo

Spruce Up Your School Pencils!

Hi Everyone! 

It's Brittany, and I'm back with another DIY project! I had originally planned on posting this project back at the beginning of September for Back to School, but I never got a chance. Anyway, this is a simple and budget-friendly project to revamp those boring Number 2 pencils for school. Let's get started! 


Things You Will Need:
- Pencils
- Washi Tape
- Scissors

Step 1:
The first thing you need to do is choose a washi tape that you wish to use. Once you have chosen a washi tape, take the tape and start to unravel it from the roll. Do this slowly. You only want to unravel enough for the length of the pencil. 

Step 2:
Place one end of the tape underneath the silver metal part that holds the eraser. Match the other end of the tape to the end of the pencil. If there is some excess, you can cut that off with your scissors. 

Step 3:
Repeat the last step until you have covered the pencil. Cut any excess off the bottom. Press down on the tape to make sure that it is all sticking to the pencil. When you are ready to use, you can sharpen it! 

And that is it! You have spruced up your boring old pencils with just a couple of materials. This is such a fast way to do this and you will have some pretty fun pencils to use for school. Happy Crafting! xoxo

Friday, 10 October 2014

What Should I Do With An Old Picture Frame?

Hi Everyone!

So I am playing catchup for this week, so I'm back again with another DIY post. This is another easy and cheap project. A while back I was sitting here with a picture frame I had used for something in my wedding and I really wanted to keep it because it looked nice and vintage. However, the little prop on the back was nearly broken off. I wondered what I could do with it. Then I remembered something I had seen on Pinterest to hold little pictures. So that is what I made.

This DIY is so cheap and so easy. It took me about an hour to an hour and a half. I didn't spend any money because I already had everything I needed in my craft room. If you do need these materials, Michaels and Dollarama are good places to look for supplies.

So if you are ready, let's get started!

The Things You Need:
-old picture frame
-twine
-mini clothes pins
-glue gun
-glue gun glue sticks
-spray paint (optional)

Step 1:
Take the frame apart. Discard the back and the glass.

Step 2:
Put newspaper down in the area you are going to spray paint the frame (this is optional. I didn't like the colour of my frame so I spray painted!).

Step 3:
Once you are prepped for spray painting, set your frame down and put on the first coat. Let that dry (This could take anywhere from 15 minutes to 1 hour, depending on the type of spray paint you use).
Repeat this step as many times as you need. The paint can be as opaque or sheer as you like. It's completely up to you.

Step 4:
Once you are happy and the paint is dry, bring it back to your work space and plug in your glue gun. Wait for it to get hot.

Step 5:
Once hot, glue one end of the twine to the back of the frame. Then drape the twine to the opposite side and glue it down with the hot glue gun. Cut off the excess twine. Repeat this step as many times as you want. I only did it twice because my frame is small.

Step 6:
Once the glue has dried, attach the mini clothes pins and you are done. Instead of an old picture frame, you now have a newer, more modern version on a picture frame and a nice new decor piece for your home. I hope that you enjoyed this DIY. Definitely let me know if you want to see more home decor DIYs. Also, if you make your own version of this, be sure to send me a picture in the comments or attach a link so I can view them on a different social media site! Have fun and Happy Crafting! xoxo

Thursday, 9 October 2014

I LOVE FALL DIY: Leaf Candle Holder

Hi Everyone!

Sorry I haven't posted in a while. I've been busy trying to play catch-up and actually get some stuff done so that I will have stuff to post on here. Anyway, I'm back with a quick, easy, and cheap DIY home decor item for Autumn. Let's get started!

What you will Need:
-candle jar that has been cleaned out
-glue gun
-glue sticks
-fake leaves (I got mine at Dollar Tree)
-twine

Step 1:
Open the package of leaves and determine how big they are. Start laying out how you want it to look when glued around the glass candle jar. Do this while you are waiting for the glue gun to get hot (Oh ya, remember to plug in the glue gun!)

Step 2:
Once your glue gun is ready and you have decided about the placement of the leaves. Start gluing the leaves to the jar. You will want to do this part as fast as possible because the glue dries and hardens fairly quickly. Glue leaves all around the jar. You can put as little or as many as you like.

Step 3: Once you have glued leaves all around the jar, take your twine and cut enough twine so you can wrap it around the jar more than twice. I wrapped it around three times on mine! Once you have knotted it and then tied a bow, you are done! Now you have a cute little Autumn candle holder! Wasn't that easy?!?!

I hope that you enjoyed this simple and cheap tutorial. As you can tell, I only spent about 2 bucks on the leaves because I had everything else at home. If you make your own version of this, I would love to see it, so be sure to leave me a picture of it in the comments or leave me a link where I can view it on another site! Happy Crafting! xoxo