Thursday, 3 October 2013

DIY Autumn Canvas

HAPPY OCTOBER CRAFTERS!!!

I hope you all are having a great beginning to October. I have been super busy! However, I am hoping that I will have some time this weekend to post some blogs. I have a few that are ready to be posted. Anyway, this one is super simple. It took me a couple days to do but this is only because I am busy. 
Let's get started!!!!

Things you will need: 
- stretch canvas (I got mine from Dollarama)
-gold spray paint (or another autumn like colour)
-foam letters (again, these I got at Dollarama)
- felt pre-cut leaves (from Dollar Tree)

Step 1: 
Using the foam letters, spell out the word "autumn" or "fall" on your canvas. Stick these onto the canvas. Mine were stickers that had a peel-off back. Super easy!!! To make sure they stay on, put a book on top of them so that it really presses them down. 

Step 2:
Take the canvas and the gold spray paint outside. (Note: Unless you are spraying on the grass, which will be cut eventually, I encouraged putting something underneath the canvas so you don't spray paint flower pots or the picnic table!!! I've done this to the picnic table before! Oops!)Let the canvas dry. In the sun, it doesn't take a whole lot of time. You might need to do a couple of coats. 

Step 3:
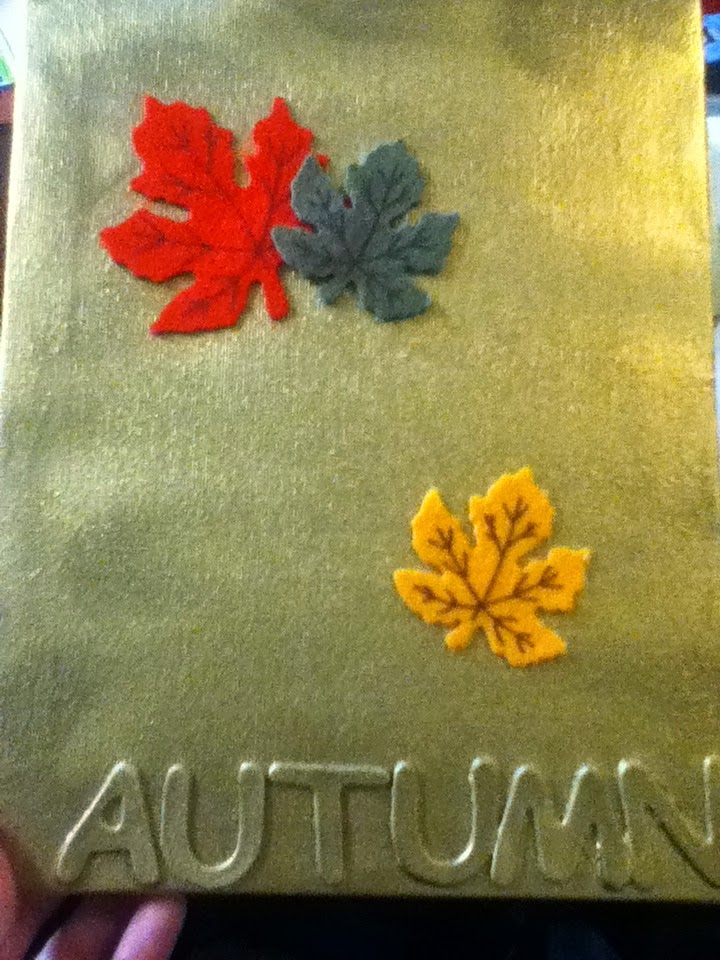
Figure out how you want to put your pre-cut felt leaves on the canvas. Once you have done this, use white glue or a glue gun to glue the felt leaves to the canvas. Let the glue dry. Then hang it up and enjoy!!!

Happy Crafting!!!


Monday, 23 September 2013

Topsy Turvey Flower Planter

Hello my fellow crafters! I'm so sorry I've been MIA for so long. I have been super busy planning my wedding. For those of you who are also planning a wedding, I will be posting wedding related ideas on here so be sure to come back and take a peek.

So today's project is something I created back in the summer, but am only posting about now. I call it the Topsy Turvey Flower Planter. It is a piggyback off of the Topsy Turvey Birdbath idea that you might have seen around. Let's get started shall we:

Things you Need:
- a metal rod (or a bamboo one, which is what I used)
-an 8" clay pot
- some 5" or 6" pots (3-5 depending on how big the rod is)
-spray paint (outdoor is preferable but if you don't have any, indoor will be fine as long as you have a sealer spray as well)
-soil (2-3 medium sized bags should be sufficient)
-little plants/flowers from Canadian Tire, Wal-Mart or wherever you buy flowers/plants from

Step 1:
First, you are going to want to paint the clay pots. You don't have to but I think it looks better than leaving them the orange-y colour they come as. I painted mine red because it is one of my favourite colours and it would pop in our garden. Once the paint is dry, spray it with a sealer if necessary.

Step 2:
Once everything has dried, take the pots outside. Put the metal or bamboo rod in the preferred spot. I chose a corner spot in our outdoor garden. Once the rod is in place, place the 8" pot on the bottom. NOTE: the clay pots should have holes in the bottom of them. This is so that you can slide them down the metal pole.

Step 3:
Once you have slid the 8" pot down the metal rod, start sliding the smaller pots down. You will need to fill the 8" pot with soil before putting the next clay pot on top of it. You will need to alter the direction of the pots so that every other one faces the opposite way.

Step 4:
Fill each of the 6" clay pots with soil and then add your plants and flowers. Because it gets heavy with the soil and flowers added, you may need a wood post to stabilize the metal rod. This can be done with some twist ties or some twine.

Once the flowers or plants have been planted, water them if needed and ENJOY! You now have a topsy turvey flower planter. HAPPY CRAFTING!!! xo

Tuesday, 13 August 2013

Geometric Butterfly

Hello, all my fellow crafters! Sorry I have been MIA this summer. It's been pretty a pretty busy season! Anyway, I will be posting a few more posts in the near future. I will also start posting DIY ideas for wedding stuff as well, as I am now recently engaged. With that being said, let's get started.

This afternoon's DIY project is a great one for kids. It crosses Math with Art and is fun for the kids without them realizing they are doing Math. I did this with my students during my second placement at Teacher's College. It is easy and turn out really pretty.

Things you will need:
- white construction paper (this will be the wings)
- black construction paper (this is the body and head)
- crayons, markers and/ or pastel
- geometric shapes (squares, rhombus, triangles, hexagons etc)
- a pencil
- a template for butterfly wings (optional)

Step 1:
Kids will receive one piece of black construction paper and one piece of white construction paper. Tell them to fold them both in half. Demonstrating this might be helpful. Once the pieces are folded, have students draw out a body and head on the black piece using a pencil. **Note: Make sure they are aware to have the body and head attached.

Step 2:
Next, take the white folded construction paper and while folded, draw one half of the butterfly wings. They may want to use scrap paper first to practice their wings before drawing it on the construction paper.

Step 3:
Once the body and wings have been drawn, keep the construction paper folded in half and cut out the wings and the body. Next glue the body of the butterfly where its fold meets the fold in the wings. Let this dry.

Step 4:
Once it it dry, it is time to draw the shapes on. Take the shapes and trace them where you want them to sit. It doesn't have to be symmetrical like mine is in the picture. This was for a culminating task for my students who had a critera for their butterflies. Yours can be done however you like. Once you are done, start colouring them in.

Step 5:
Once you have coloured in all the shapes, you may want to colour in the area around the shapes. This helps the shapes pop. You can also decide to leave it white. It's up to you. Get creative! Happy Crafting!

Thursday, 20 June 2013

4 Seasons Canvas Painting

Hey All! Sorry I've been MIA for a bit... It's been exciting couple of months. First off, I graduated from university with a degree in Education. So I am now officially a teacher.. well, I still have to get my license but I have the degree. Secondly, I am newly engaged. My boyfriend (now fiance) proposed on a little weekend vacation we took to Montreal. I totally was not expecting it. He was pretty sneaky about it. Thirdly, I have been volunteering at a local school, helping out in the Kindergarten room.

So much is going to be happening this summer. It's going to be a busy one. I hope you all can bare with me. I hope to get more published as I have a bit more time now that school is out. Okay, so on with the project.

This project is a 4 seasons canvas painting. I made this for my mom, whose birthday was at the beginning of June. My mom really likes trees so I painted a tree depicting all four seasons on it. Let's get started!

Things you will need:
-Canvas
-paint
-paintbrushes
-sealer spray

Step 1:
Divide the canvas into 4 sections. If you can't find a big canvas, use four small ones that are all the same size. (Make sure to put them side by side for this part).  Draw lines to depict the four sections (ignore this is you are using four separate canvases). Next draw your tree. (Note* if you are using four different canvases, you will want to put them together so you can see the whole tree and not just pieces of it. You want things to line up)

Step 2:
Use paint (I used water colours) to depict the background of each season. I used green for spring, orange for summer, red for fall and blue for winter. You can get creative with this is you want. Once that dries you are ready to paint the tree.

Step 3:
Paint the tree any colour you want. I went with black because it's my favorite color and I wanted the emphasis to be on the seasons and not the tree. Make sure to fill out branches especially where the branches meet the trunk of the tree.

Step 4:
Decorate your tree, once it has dried, to depict the different seasons. (See my picture for ideas). Let it dry once all four seasons are complete.

Step 5:
To protect the painting from moisture etc, spray the canvas with a sealer. You can buy this at places like Canadian Tire or Walmart. I have a gloss version which I purchased at Canadian Tire.

Happy Crafting!


Monday, 6 May 2013

Dreams in plans canvas

Hello Everyone! Sorry I have not been posting as often as I said I would. I have been kinda busy the last few weeks, but now that things are starting to slow down, I'm hoping to get back into posting again. Today's post is something I made for my little sister for Christmas this past December. Here is what you need...

- Canvas (size doesn't matter)
-Paint (in colours you prefer)
-Markers
-Stamps
-Glue
-Printer and Printer paper
-Scrapbook paper

Step 1:
Paint the canvas in your desired color. I have painted mine purple because I wanted the figure of the girl to pop. You can decide on your own what color you wish to paint the canvas.

Step 2:
Choose a font and font size to create the saying "She turned her cant's into cans and her dreams into plans". Next, cut each word out and glue to the dry canvas.

Step 3:
Find some sayings you want to include on your canvas. For the one I made for my sister, I wrote, in purple marker "Suivez votre coeur" (Follow your heart) and "believe". I also wrote some numbers down the sides. Next, take a lighter color of the color you painted the canvas and blot it onto the canvas. (see picture)

Step 4:
Once that is dry, you can start putting the girl onto the canvas. To do this I printed out a picture of a silhouette and traced it onto the canvas. Next, I painted it black. Once that was dry, I took some scrapbook paper to make the shirt and hair. For the skirt, I googled sheet music and just printed some off. I crumpled it up and ripped it into my desired length of strips. Glue all of these on in the desired areas. If regular glue doesn't work, use a glue gun.

Step 5:
Once it is completely dry, use a clear gloss protective sealer so it will protect all your hard work. Just a light coat will be good. Leave it to dry and then wrap it up as a gift or hang it some place in your home!
Happy Crafting!!!!!

Saturday, 2 March 2013

DIY Dry Erase Paint Chip Calendar

Hey my fellow crafters! Hope everyone is having a great weekend!
Tonight, I'm going to show you how to make your very own dry erase calendar, using a few simple things. This would make a great gift (I made this for my mom for Christmas this past year) or something unique for your apartment or house. It's so easy you can do this with kids, whether you are babysitting or have some of your own.
LET'S GET STARTED!!

Things you will need:
- paint chips in many colours (depends on what you want it to look like- these are free usually at any store that sells paint!)
-a frame in your preferred size
-glue
-a marker

Step 1:
The first thing you will want to do is cut apart the paint chips (unless they are already separate). Remember you will need enough to be able to cover the whole month. I had 42 squares - 7 across the top for the Days of the Week and 5 rows underneath for the each day in the month.

Step 2:
Once you have cut them out, take your frame and arrange the squares/rectangles. (Mine came out as rectangles). You can change the background color if you have a piece of paper the size of your frame in the color of your choice. I just used the back of the page that comes in the frame. I got the frame at the dollar store for 3 bucks. Once you have decided on an arrangement, start gluing the squares/rectangles down. Drawing lines on the paper in pencil may help with this. ** Also make sure you leave space to write the month**

Step 3:
Once you have completed gluing down the paint chips, you can erase the lines (if you made some) or you can take a black marker and go over them. Put the page back into the frame with the paint chip side facing towards the glass/plexi-glass. Close the frame up!

Step 4:
Now that it is complete, write the month and days of the week on the designated spots. I included a Notes section because I had some extra space! My frame was pretty big. Once you have done that, pair it with some cool coloured dry-erase markers. If you're giving it as a gift, wrap it up in a cool way!
HAPPY CRAFTING!!!

Tuesday, 26 February 2013

DIY Abbey Road Canvas

Hello all my fellow crafters!

Sorry I've been gone for so long. It's been a busy past few months. Hope you all have kept up with your crafting!
Today's DIY project is fairly easy! Let's get started!

Things you Need:
-canvas (size is your choice)
-paint (your choice) - I chose black and white!
-paintbrushes
-paper silhouettes of The Beatles

Step 1:
Print out the silhouettes in the size of your choice. Try not to make them too big though. You want it to be proportional to the canvas. Cut them out and tape them down to the canvas.

Step 2:
Next take the paint and paint around the silhouettes. Once you have painted around them, splatter the paint on the canvas. Let the canvas dry.

Step 3:
Once the canvas is dry, peel off the taped silhouettes. Some of the paint may have seeped under the paper silhouettes. You will need to touch it up with the white paint. Let it dry. You make need to do a couple of coats.

Step 4:
Once it is dry, seal it with a glossy sealer. Let that dry and you are finished!

I made this for my sister for Christmas. She loved it! Happy Crafting!!!!