Friday, 30 September 2016

It's Fall Y'all: DIY Plaid Fall Coasters

Hi Everyone!

I hope you are all enjoying this cloudy Fall Friday lunch hour! I thought it was about time I brought you all a new DIY. I have been busy doing a bunch of DIY-ing so be prepare for some more Fall/Halloween stuff coming soon!

So in this DIY project, we are going to be Plaid Coasters for Fall. I saw this idea on Pinterest and thought it was the cutest thing, so naturally I had to attempt this for myself. The project is relatively easy but time consuming so be sure to set aside some time and perhaps binge-watch your favourite show on Netflix at the same time! I will also have a Youtube video of me making this DIY so if you are more of a visual person, then look below for my link to my channel.

The things you will need:
- Plaid Material
- Felt (doesn't matter what colour as you won't see it)
- Sewing thread
- Sewing Needle
- Scissors
- Pins

** If you don't have thread or a sewing needle, you can substitute those two items for a hot glue gun and glue sticks.

Step 1:
Cut the plaid material into squares approximately 4.5 inches by 4.5. Remember that you want to have a little bit of space to be able to sew or glue the two pieces together, but you want it to be big enough to fit the glass or mug on it.

Step 2:
Once all of your plaid material is cut into squares, do the same thing with the felt, cutting it a bit smaller. Don't worry if it doesn't fit at this moment or you cut it too big, you can always trim it down later.

Step 3:
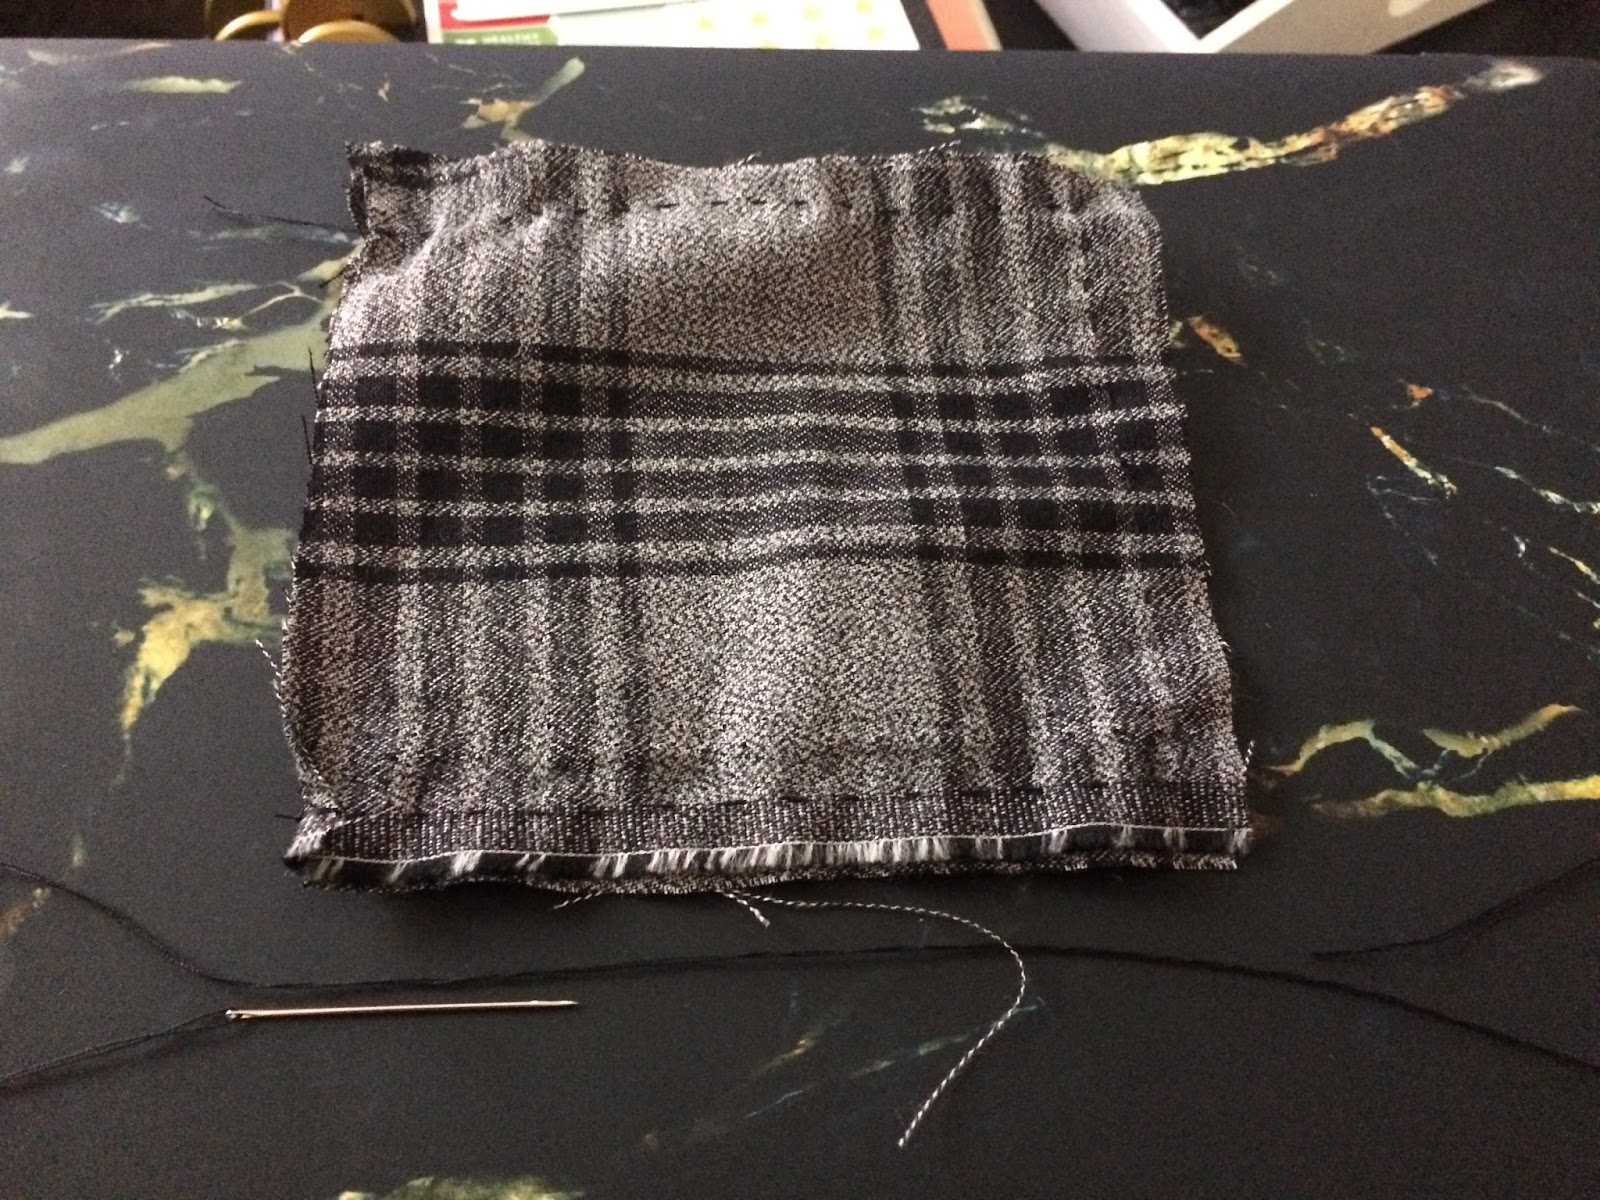
Take your two plaid squares and pin them together (if you need to). Be sure to leave one side open so you can turn it right side out. Then begin to sew (or glue) them together. Do this until you have secured three sides. Then cut the string, leaving enough to tie it. Once you have tied it off, you can cut the little tail and turn it right side out.

Step 4:
Take your piece of felt and put it inside the little pocket you have made. If you need to trim it, do so now. Once you have it inside, fold the two open pieces down inside the pocket. Pin them together so that you have shut the square completely. Then sew the opening shut, using a criss-cross pattern on the inside of the two flaps. ** If you are gluing instead of sewing, this part can be tricky so I would suggest pinning it together and then one by one taking the pins out and gluing on section at a time.

Step 5:
Once you have finished sewing the flap shut, tie it off. Once you have tied it off, cut the little tail off and you are done. You have a beautiful plaid Fall coaster. Continue this however many times you want until you have the desired number of coasters.

Anyways, that is all there is to it! Like I said, it is time consuming but not necessarily hard. So grab your supplies, your computer and turn on Netflix and get crafting! I hope that you guys enjoyed this tutorial. Look below if you would rather watch my Youtube video on how to make these awesome coasters! Thank you all for coming to check out this blog post and until next time, Happy Crafting! xo


Happy Fall Y'all: DIY Autumn Coasters Video:
https://www.youtube.com/watch?v=01ZahViFKB8
My Youtube Channel:
https://www.youtube.com/channel/UC4HLUixems2ln2CfNguupjQ
The Britt Report Blog:
http://brittreport.blogspot.ca/

Tuesday, 8 September 2015

Back 2 School Cool: Spruce Up Those Boring No.2 Pencils!!!

Hey Everyone!!!

Here is the second post to my Back 2 School Cool series. Below you will see the corresponding Youtube video should you prefer to watch my DIY tutorial instead of read about it. Be sure to like and subscribe so you don't miss out on more awesome DIY projects coming up! Today's tutorial is an update of a previous post I published last August or September. We are sprucing up our boring, old pencils in time for the school year. It is a super cheap and easy project to do! Let's talk about what you will need!

Things You Need:
-pencils
-washi tape (make sure its the paper tape and not the more sticker-ish tape)
-scissors

THAT'S IT!!! LET'S GET STARTED!!!!

Step 1:
Take your preferred washi tape and your pencil. Lay the pencil horizontally and unravel some washi tape next to it. Go from the bottom of the metal eraser holder to the end of the pencil. Cut the washi tape.

Step 2:
Slowly smooth the washi tape onto the pencil. I find that doing one of the flat surfaces first and then the next and then the next is easiest. Turn the pencil over and repeat Step 1 and Step 2.

Step 3:
Once you have completed wrapping the pencil, you can now sharpen it and use your snazzy new pencil. Using the paper washi should make sharpening the pencil possible. Using the sticker-ish washi doesn't work so well and makes the whole thing look like a disaster (Yes, I am speaking from experience!)


Wasn't that easy!?!?! I hope that you enjoyed this updated post and the video to go along with it. Be sure to like and subscribe to my channel if that is what you prefer. I would love to have you in my Youtube family. If you are more of a reader, that follow me on Google Plus. I'd love to have you in my Google Plus Family as well! Be sure to leave me comments either here or on Youtube showing me your creations. I'd love to see them! Until next time, xoxo!


Wednesday, 29 July 2015

Planner Decor on a Budget: DIY Ribbon Page Flag {Updated}

Hey Everyone!

So since deciding to start a Youtube channel, I decided I would update this post, as I wasn't happy with the outcome of the original post. I felt like I had a hard time trying to convey what the steps were and I forgot to take pictures of each step..... So this time, I've filmed it for you to give you a visual aid of the DIY process for this project.

This project is very simple and not expensive at all. Most dollar stores sell some pretty ribbon and you can find cheap ribbon at places like Walmart and Micheals (check the $1.50 section at Micheals). Paper clips can be found just about anywhere. I got these gold ones at Staples for about $2.50. This project definitely won't break your bank and the end result is a really nice page flag or bookmark! Let's get started!!!

Things You Need:
-paper clips (in the colour of your choice)
-ribbon (in the colour, sizes and patterns of your choice)
-scissors

Step 1:
Choose the ribbon and the paper clip you want to use. With the ribbon,you want to take it out of the package and determine which ribbons you want to group together.

Step 2:
Once you have determined which ribbons you want to use, take it and measure out about 5-6 inches of ribbon. Take the scissors and cut it and then put the rest of that ribbon to the side. Do this for however many pieces of ribbon you are using. Don't worry if the ribbons aren't all the same length... you can trim the ends later!

Step 3:
Next, take the ribbons you cut and place them carefully on top of one another. This will be tricky if the ribbons are bent like mine were. Then take the two ends and put them together.

Step 4:
Take the loop of the ribbons and put it through the solo loop of the paper clip (Please see my video below if you are confused). Don't pull the loop all the way through. Once you have gotten through the centres of all your strings and bring them all through the loop you've made, making sure that you have wrapped the ends around the paper clip while sliding them through the loop made in the ribbons (Again, see the video if you are confused). Pull the ends tight. You may need to do this with each individual ribbon end.

Step 5:
Finally, trim the ends so they are all the same length. Discard the pieces you just cut off in the trash.

That's it! Wasn't that easy!!?? I hope that you guys enjoyed this post and the video linked below. If you want to see more videos like this, be sure to like and subscribe to my Youtube Channel.There will be lots more videos coming up, both DIY and Lifestyle related! Stay Tuned and until next time, Happy Crafting! xoxo

Wednesday, 15 July 2015

Big Announcement!!!

Hi Guys!!!

I hope you all are enjoying this cooler, sunny weather on this wonderful Wednesday! Today, I just wanted to come on here and tell you my big announcement! Are you ready?

I now have a....... YOUTUBE CHANNEL!

I will still be blogging, but I will also be attaching my videos to the blogs. I have posted the link below!

I started a Youtube Channel because I was finding it hard to get my point across in regards to whatever I was talking about in my post. I was finding it especially difficult in my DIY blog. I kept feeling like I was going to confuse all of your readers because I myself would get confused when reading back what I wrote. With the encouragement of family and friends, I decided to take a leap. I want to share with you all the things I know, my opinions, cool things I find and everything in between. I hope that you enjoy the Youtube channel as much as the blogs. And remember I will still post on here, with or without video content so be sure to come back and check the blogs out.

With much love,

Brittany
https://www.youtube.com/channel/UC4HLUixems2ln2CfNguupjQ

Summer Fun: DIY Door Wreath for Canada Day!

Hi Everyone!

I'm back with a DIY home decor post. I know Canada Day has passed, but I figured I would post this anyway. Its a fairly easy project that doesn't take too long to make. Let's get started, shall we?

Things You Need:
-round, styrofoam wreath
-burlap
-Canada Day garland
-Canada Day bow
-Glue gun
-Glue sticks

Step 1:
Take the styrofoam wreath and the glue gun and use it to wrap the burlap around the wreath.Do this quickly because the glue will dry fast.

Step 2:
Next, glue the Canada Day garland around the top of the wreath. See the picture to the right.

Step 3:
Next, glue the bow to the bottom of the wreath. There was a twist tie but I couldn't get it to stay very well. Gluing it worked way better.

Step 4:
Finally, hang the wreath at your front door or wherever you are going to hang it.

I hope you enjoyed this little DIY project for Canada Day. I'm sorry it came too late for Canada Day but perhaps you can use it for next year. If you do end up making it, please let me know by commenting in the comment box below. Until next time, Happy Crafting! xo


Monday, 8 June 2015

Planner Decor on a Budget: DIY Tassel Accessories!

Hi Everyone!

Sorry I've been gone for so long. If you haven't been following my other blog, I have been pretty MIA the past couple of months. I spent a lot of the first month sick and May was pretty hectic because the hubby and I were in the middle of moving. I'm hoping that come July things will have settled back down and I will be back to posting twice a week. I still have to finish re-vamping The Crafty Canadian! Oh my! Anyway, I thought I would just pop on and bring you a quick little tutorial for you fellow planner people out there! I have become obsessed with decorating my planner and since we have bought a house, looking for cheap ways to get the same kinda products you can buy in the store.

This week's tutorial is a DIY Tassel! They are fairly simple, yet a tad time consuming. Let's get started, shall we?

Things You Need:
-scissors
-thin wire (in your colour choice, I went with gold)
-embroidery thread
-paper clip (optional)

Step 1:
Take your embroidery string and remove the little paper pieces. You want to find an end and cut off two pieces of string about 5 inches long. The length of the one string will depend on how far you want the tassel to fall. Try to do this without unravelling the wound string.

Step 2:
Once you have cut the pieces you need, take the string and without unravelling it, create a circle so that it looks as if you have wound the string around your hands. Once you have made the circle, take the piece of string you want for the handle of the tassel. Put the two loose ends together and knot them. Take the knotted end and put it through the circle. Take the loop end of your knotted string and loop it through the knotted end. Pull tightly and your handle of the tassel should be secure.

Step 3:
Take the other piece of string and tie it around the circle of string (See picture). Cut off the excess pieces. Then cut the bottom of the circle. You may need to trim it so that it is all even.

Step 4:
Once you have completed the trimming, take your thin wire and cut a piece off. Carefully, wrap the wire around the place where you tied that second string. This is to hide that string. It is also optional.

Step 5 (Optional):
If you are attaching this to a paper clip, just take your paper clip and take the string that is the handle of the tassel. Slide the loop of the string around the paper clip until you get it to where you feel it is secure.

That's it!!! You have made your very own tassel accessory. I have actually made a bunch of these. I made them for each of my different sketchbooks and I made one for the planner I am currently using. I hope that you enjoyed this little tutorial. If you decide to make this, be sure to leave me a comment below letting me know so I can go and check it out! Until next time, Happy Crafting! xoxo

Wednesday, 6 May 2015

DIY Harry Potter Ipad Mini case {Picture to come}

Hi Everyone!

I hope you all are enjoying this wonderful Monday! The weather here in Ottawa was lovely, hence why I am posting late this evening instead of towards the beginning of the day. Today, I am bringing you a little project I found posted on Pinterest. It is a felt Harry Potter Ipad cover. Now, the post I found on Pinterest was a link to an Etsy store. Money is a tad tight right now and so instead of ordering one from this Etsy store, I decided I could probably make my own. It was way cheaper than the price I had found at the Etsy store... but it is fairly time-consuming and not a project that kids could do by themselves. With that said, let's talk about what you will need!

Things You Need:
-scissors
-sewing kit
-hot glue
-hot glue gun
-felt in white (2), black, red and yellow
-paper
-pencil

Step 1:
Start by measuring how big the white felt needs to be in order for the iPad to fit inside. I made mine a bit bigger as I don't like when it is too snug.

Step 2:
Cut the white felt. Take your sewing kit and using the white thread and a needle, sew the the edges of the felt together.

Step 3:
Next, take your piece of paper and pencil and make stencils for the eyeglasses and the hair. I found these two to be the hardest. You could probably print out templates if you wanted to spend the time searching for some.

Step 4:
Once you have the stencils made, pin them to the black felt and carefully cut along the edges of the templates. Set aside.

Step 5:
Take your red felt and cut out three squares and a lightening bolt shape. The squares will be a part of his scarf.

Step 6:
Take the yellow felt and cut a strip the same width as the red squares you cut moments ago. Make sure it is the same length as the bottom of the white felt.

Step 7:
Plug your glue gun in. Once hot, carefully glue each piece of felt onto to the white felt. I found that if you leave your iPad inside the white case you made it was easier to do. Or stick a piece of cardboard in it if you are worried about your iPad. Make sure to use a fair amount of glue. You don't want anything coming off.

Once you have finished gluing, you are done! Wasn't that a fun project? I had so much fun making my little case for my iPad mini. It turned out so cute. If any of you decide to make this little DIY, be sure to leave me a comment below telling me about it. You can also leave me a picture or a link to your own posts so I can go and see them. Again, I hope you enjoyed! Until next time, Happy Crafting! xoxo