Monday, 1 September 2014

DIY Magnet Sign

Hi my fellow DIY-ers!

Happy September! I cannot believe that the summer is over and school starts tomorrow. With the spirit of getting organized in order to start a new school year off right, I came across a little DIY project on Pinterest a few weeks ago. It is a magnet sign for your dishwasher so those in your family will know whether the dishwasher is clean or not. It is a good way to let people know whether or not they can put things in dishwasher or if it needs to be emptied. In my household, this is going to come in handy because with my husband at work a lot and me at home, he never knows if I've turned it on or emptied it and I never know if he has looked after it while I was out or busy. It's a very simple little DIY that will only take an hour tops! Let's get started, shall we?

Things you will need:
-scissors
-sticker paper
-magnet (one large enough to write on)
-pencil
-markers

Step 1:
Place the magnet over top of the sticker paper. Take your pencil and trace around the outside of the magnet. Cut it out

Step 2:
Carefully, peel the backing off the sticker paper and place on the front side of the magnet (the side that is not magnetic). You may need to cut out more pieces from the sticker paper. I had to do this with mine so you couldn't see what was on the actual magnet.

Step 3:
Once, the magnet is covered to your satisfaction, take your pencil and split the space in half horizontally. On one side write Clean and then flip it around (so that Clean is upside down) and write Dirty.

Step 4:
Use your markers to design it however you like. Do this until you are satisfied with it. Then hang it on the magnetic part of the dishwasher. (Note* Make sure your magnet is strong enough to stay on the dishwasher. Mine is not, so I need to get a stronger magnet and attach it to my sign.

And that's it! You're done your magnetic sign for your dishwasher. Hope this was a good tutorial and that you had fun creating this sign. Happy Crafting! xo


Wednesday, 6 August 2014

Wedding : DIY Frames

Hi Everyone!

So I've been completely MIA lately. I have been incredibly busy, which is crazy considering all the wedding stuff is now over. We have been busy though. Anyway, I'm sorry and I'm back hopefully, with more regular posts. Tonight, I'm coming at you with another DIY project for weddings (or for any party). They are DIY frames and they are super easy. Let's get started!

Things you will need:
- frames (different sizes, in your desired colour. I found two of mine at Dollarama and the other was at Value Village)
-paint (in your desired colours if you bought the frames from the Dollar store that you paint yourself)
-paintbrush
-nice wrapping paper or scrapbook paper (I got black and white damask wrapping paper for $1.50 at Michael's)
-White printer paper
-Computer
-Printer

Step 1:
Take the frame apart and paint it.You may need more than one coat on them depending on the desired colour. Let those dry.

Step 2:
Once dry, place glass back in the frame. Take the little paper and use this as a guide to cutting out your decorative backing. I traced the outline of the piece of paper onto the back of my wrapping paper. I think I might have even secure it to the little paper with tape.

Step 3:
Once you have all the right sizes for the decorative backing, go to your computer and using Word or a program similar to word, type out what you would like to say in the frame. You can play around with font and style of font after you have typed out what you want. For examples, you can google what you are looking for or refer below for  "Welcome to our wedding", "Candy Bar" and "Guest Book" templates.

Step 4:
Once you have what you have done on Word, print it out. Cut it out so that it fits nicely on your decorative frame but isn't hidden by the frame (if there is an overlay). Tape your sentences down. Try to make sure it is centred.

Step 5:
Once everything is taped down, put everything back into the frame and close it up. With that you have a great frame that can welcome guests or instruct guests as to what they need to do for a specific table.

I hope that you all have enjoyed this DIY project. Like I said, it can be used for a birthday party or a wedding or any kind of party. It is a nice and easy way of instructing guests about what to do. Happy Crafting! xoxo

Monday, 7 July 2014

Wedding DIY : Labels for Candy Bags!!!

Hey Crafters!

So I figured I would post another DIY project tonight seeing as I have been on such a long hiatus!!! So here is a Wedding DIY project! This one is rather simple!

Having a candy bar at a wedding reception was a cool idea and something that my husband and I did since I love candy so much! Instead of getting candy bags professionally made by someone else, and spending a ton of money, I decided I would make my own and save a buck! It was rather simple, but a tad time-consuming. I now know why people get these things done by someone else. Anyway, let's get started!

Things you will need:
- un-cut label sheets (I had this sticker paper from awhile ago and just used it. I don't think it is supposed to be used for labels. It doesn't have any pre-cut borders etc).
- printer and ink
-scissors
-pencil
-fine point sharpie
-computer

Step 1:
Using your computer, go into Microsoft Word or a similar program and create a sheet of labels. You might have to download a template if you can't find what you are looking for. I had to do this using Open Office.

Step 2:
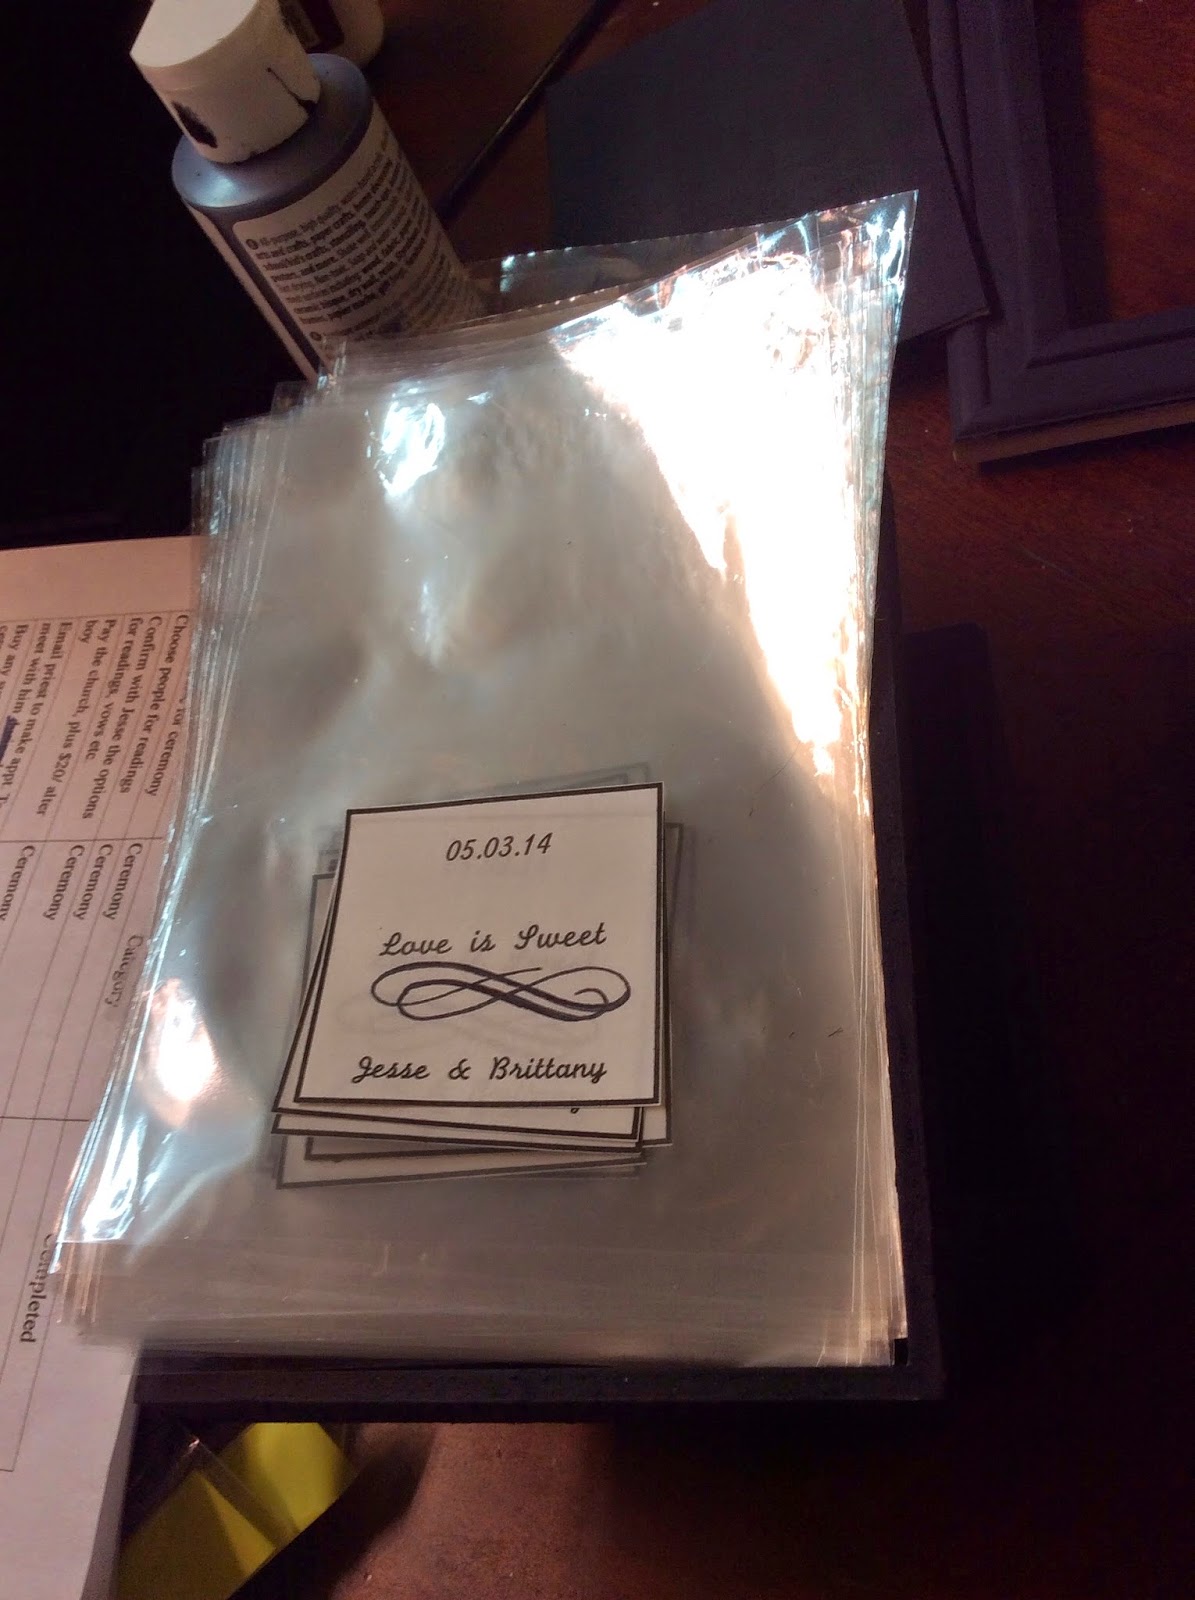
Once you have chosen the look you want, play around with it. Add a thick border, put your names or initial or whatever you want it to say. For the candy labels (see the picture to the right), we put our names, a saying "Love is Sweet!" and the day we got married. It's up to you, and how you want them to look. I wanted them to be simple yet classy.

Step 3:
Since I'm not computer savvy, I don't know how to make fancy designs on the labels. So I got the nice design on underneath "Love is Sweet!" by tracing a line design off my computer. The sticker paper isn't suitable for tracing so you might need to get a piece of scrap paper and use that to trace. If you rub the back with pencil lead and then just use it as a transfer onto the stickers, it should work. Once all your labels have the transfer on them, go over the transfer with a fine-point sharpie pen. Try to do it with a steady hand. I would suggest a design that isn't too elaborate.

Step 4:
Now, very carefully, cut out each label. Cut outside the black border you put around each label. It makes it was easier to cut them out because it gives you a guide to look at while cutting. Try to cut as close as the outside of the black border as possible.

Step 5:
Once they are cut out, centre it on the bag. Then peel the backing off and stick it on. Do this for the rest and you have your own personalized candy bags!

I hope you guys enjoyed this DIY project. You don't have to do this for candy bags. You can do this for lunch bags, binders, books etc. The sky is the limit! Happy Crafting! xo

Tuesday, 3 June 2014

Fun and Easy Fruit Skewers!!! Perfect for a summer evening snack!

Hi Everyone!

I'm finally back after a bit of a hiatus! Just a little life update before I get into this easy and fun DIY project! I got married! As most of you know, over the past year I have been posting some wedding related DIY projects! This was because of my upcoming marriage. Now I can tell you that Jesse and I are officially married now! Yay!!! So if any of you were wondering why I haven't really posted a lot of stuff on here, it has been because the wedding planning and then actually getting married was my biggest priority. I'm back now, so hopefully, I will start posting projects a little more regularly than I have in the past!

Anyway, let's get started! Today's DIY is a food related one. I made these on Valentine's Day for my now-husband as our dessert after I cooked him dinner. They are fruit skewers with chocolate drizzled on them. I mimicked the ones you see in Godiva. One of my best friends and I stopped in Godiva once and had a fruit skewer - DELICIOUS! But they are just as easy to make at home.

Things you will need:
- Variety of fruit (I went with bananas and strawberries since those go the best with chocolate)
-skewers (you can buy these in packs of 100 at the dollar store)
-semi-sweet chocolate chips
-microwaveable bowl
-microwave
-ziploc baggie
-scissors

Step 1:
Wash any fruit that needs to be washed. Then cut or peel the unnecessary parts of the fruit. Once you have done that, slice the fruit into pieces. You want them to be thick enough to stay on the skewer. I would say about 1cm is good. I found that if you cut them thinner, they would slide off and if you cut them thick, they were too heavy and would slide off.

Step 2:
Once you have cut the fruit up, you can put it on the skewer. I patterned mine. I started with a top of a strawberry and then a banana and then another piece of a strawberry until i have covered nearly the entire skewer. I only made two but you can make as many as you would like.

Step 3:
I then set the skewered fruit aside and put about a quarter of a cup of semi-sweet chocolate chips into a microwaveable bowl. I placed it in the microwave for 15 seconds at a time. You don't want the chocolate chips to burn. Once they are fully melted, open your little ziplock bag and put them melted chocolate in it. Try and put it more to one end. Close it up and make sure you get the air out.

Step 4:
Cut the tip off the end where you put all the melted chocolate. Use the bag as a piping bag and drizzle the icing over the skewers. Try and use all the chocolate but don't worry if you can't. Just keep it someplace safe for next time. Place the skewers in the freezer so the chocolate can harden again. Leave it for about half and hour. This should give it enough time to fully harden. Once they are hardened, you can take them out and enjoy. Be careful with the pointy end of the skewer. Happy Eating!!! xo

Saturday, 25 January 2014

DIY Shadow Box - Valentine's Day Edition!!!

Hello Again, my fellow Crafters! 

I'm back with yet another inexpensive and easy diy decor project. So with Valentine's Day right around the corner, I thought I would try and post some Valentine's Day themed DIY projects! This one is similar to my Christmas Shadow box post. It's quick, easy and so festive. Let's get started!

Things you will need:
-shadow box
-paint
-paint brush
-scrapbook paper
-foam letter stickers
-festive decor to put inside the frame

Step 1:
Obtain a shadow box. I got mine from Value Village on a whim. But you could also find paintable ones at places like Micheal's. If you don't want to paint them, I know you can find little ones at Dollarama. 

Step 2:
So if you decided to paint one, you can start now. You may need to paint a few coats onto it. Let it dry. If you opted for one that couldn't be painted, go to the next step.

Step 3:
Once you have let it dry, take the scrapbook paper you have chosen and measure out the size of the background. This could be tricky if you have one like me. Try to get the edges as close to the sides as possible. Once you have it how you want it, feel free to secure it to the back of the shadow box. I chose not to because I want to interchange the backgrounds and decor. 

Step 4:
Next, decide on a saying or word that you want to put on the scrapbook paper. I went with "xoxo". My foam letters are pretty big so if you do use foam letters, try and find smaller ones. Other things you could put are "smooch", "heart", "love", "kisses" or "hugs". The possibilities are endless! 

Step 5:
Once you've done the word/wording, you can put your little decor into the shadow box. I went with these red glitter balls. I think it makes it look so nice and festive. Then you can close it up and you're done! 

It was that easy! Now find a spot for it and enjoy! Happy Crafting! xoxo


DIY Shadow Box Decor - Christmas Edition! (Better Late than Never!)

Hey Everyone! 

I'm back again with another easy decor project. This one is a little late since it is a Christmas one, but hey, better late than never! This could be given as a gift or just made for a space that needs a little bit of decorating! It is super easy and fun to do. Let's get started!

Things you will need:
- shadow box
-paint
-paint brush
-scrapbook paper
-scissors
-scrapbooking stickers
-different sized Christmas bells

Step 1:
The first thing you need to do is obtain a shadow box. You can get these anywhere. If you want to paint it a certain colour, I would suggest going to a craft store like Micheal's. If not, you can get them at places like Dollarama. I lucked out and found a few at my local Value Village so you can always check out places like that too.

Step 2:
Once you have the shadow box of your choice, you can paint it a preferred colour. I went with Christmas red. You may need to prime it or do more than one coat. I think I did two coats on mine. Let it dry.

Step 3:
Once it is dry, you can take your scrapbook paper and measure how much you will need to fill the background. I found this to be the trickiest part because my shadow box was made a little bit weird. Try and get it as close to the edges at you like. Once you have chosen a background and cut it out so it fits, you can place it inside the shadow box.  (I didn't secure mine to the shadow box because I'm going to interchange the little paper and decoration inside the frame, but you can secure it if you wish)

Step 4:
Once the background is in, place your scrapbooking sticker(s) to where you want it. I chose "Jingle All The Way" because of the bells I am placing in it. You could also use foam letter stickers. I was going to but mine were too big.

Step 5: 
Once the scrapbook sticker(s) have been placed, go ahead and place in your Christmas bells. I chose silver because I couldn't find gold ones. I think it looks just as nice. Go ahead and close it up after that and voila!!! You are all done!

I hope you enjoyed this quick, easy and inexpensive little diy project. I will be posting more diy projects in the near future because I am doing a lot of diy wedding stuff so look for that! I also hope to get some Valentine's Day stuff up as well! Happy Crafting! xoxo

Monday, 20 January 2014

DIY Boutonnieres for Groomsmen and Groom!

Hey Everyone!

I'm back from my little holiday hiatus. I was actually going to post some DIY projects over the holidays but then got so busy that I didn't have any time to. Anyway, I'm back now and have been diving into wedding stuff, so get ready for a bunch of wedding DIY projects. Let's get started with this one. 

So if you are like me and think that flowers are great, but it's really not worth spending a small fortune on just to toss them in the air or decorate the church or reception hall with them, then go with fake ones. They are just as good, they will last waaaay longer and you can find some really nice looking ones if you shop around. I found mine at Ikea around the time the holiday stuff came out. The boutonnieres we are making today are just rose buds off the flowers I used for the bouquets. (Look for that post coming soon). Let's get started!

Things you will need:
-wire cutters
-floral tape
-flower(s) of your choice
-ribbon of your choice
-hot glue gun sticks
-hot glue gun
-scissors

Step 1:
Once you have chosen the flower you want to be in your boutonniere, you need to cut the stem to the desired length using the wire cutters. I say to use wire cutters because my flowers had wire in the stem, which I'm assuming most fake flowers would. 

Step 2:
Decide on how you would like the boutonniere to look. For me, I had three options. The first was to have the rose bud with three leaves. The second, to have it just stand alone with some ribbon and the third, to have the rose bud with one leaf to the side. Make sure you decide how you want it to look before you do any gluing or taping. I chose the one leaf on the side because three leaves was too much and the rose bud by itself looked weird. 

Step 3:
Once you have decided on your look for the boutonnieres, you can start gluing the leaf to the rose bud. I glued the stem to the back of the rose bud and put some glue on the bottom of the leaf to attach it to the rose part of the flower. Do this for all the boutonnieres. Let them dry. 

Step 4:
Once the glue has dried, take the floral tape and wrap all the stems as far as you can go. Floral tape is a little tricky if it's your first time using it. You have to stretch the tape first to activate the adhesive and then stick it to your stem. This will also help the tape stick to itself. Do this for all your boutonnieres. 

Step 5:
Once all the boutonnieres are wrapped in the tape, you can wrap them in the ribbon. Be sure to always glue on the backside of the boutonnieres. You don't want the glue or end of the ribbon to show in pictures etc. I found that starting from the bottom and working your way up worked best. Put some glue at the bottom of the stem and place the ribbon on it. Hold it there until dry. Then wrap as tight as you can up the stem until you get to the top. (Be sure to cover as much as you can). Place some glue at the back of the stem again at the top and hold the ribbon down until dry. Using scissors, cut the ribbon as close as you can to where the glue ends at the back of the boutonniere. 

Step 6:
Go over each boutonniere and get rid of the glue strings and excess chunks of glue so that they look polished and nice. 

That's all there is to it! Once you get the hang of it, it becomes rather easy. It is rather time consuming so make sure you set aside a lot of time to do this task. Good luck and Happy Crafting! xoxo